React 最佳设计模式与高级技巧 🌟
React 是一个灵活而强大的库,但要写出清晰、可维护的代码,遵循一些设计模式至关重要。今天我们将深入探讨一些最佳实践,并加入更多的高级技巧,让你在 React 开发中游刃有余。
1. 单一职责原则 (Single Responsibility Principle) 📚
每个组件只做一件事。如果一个组件的功能过多,可以将其拆分为多个小组件。
示例:
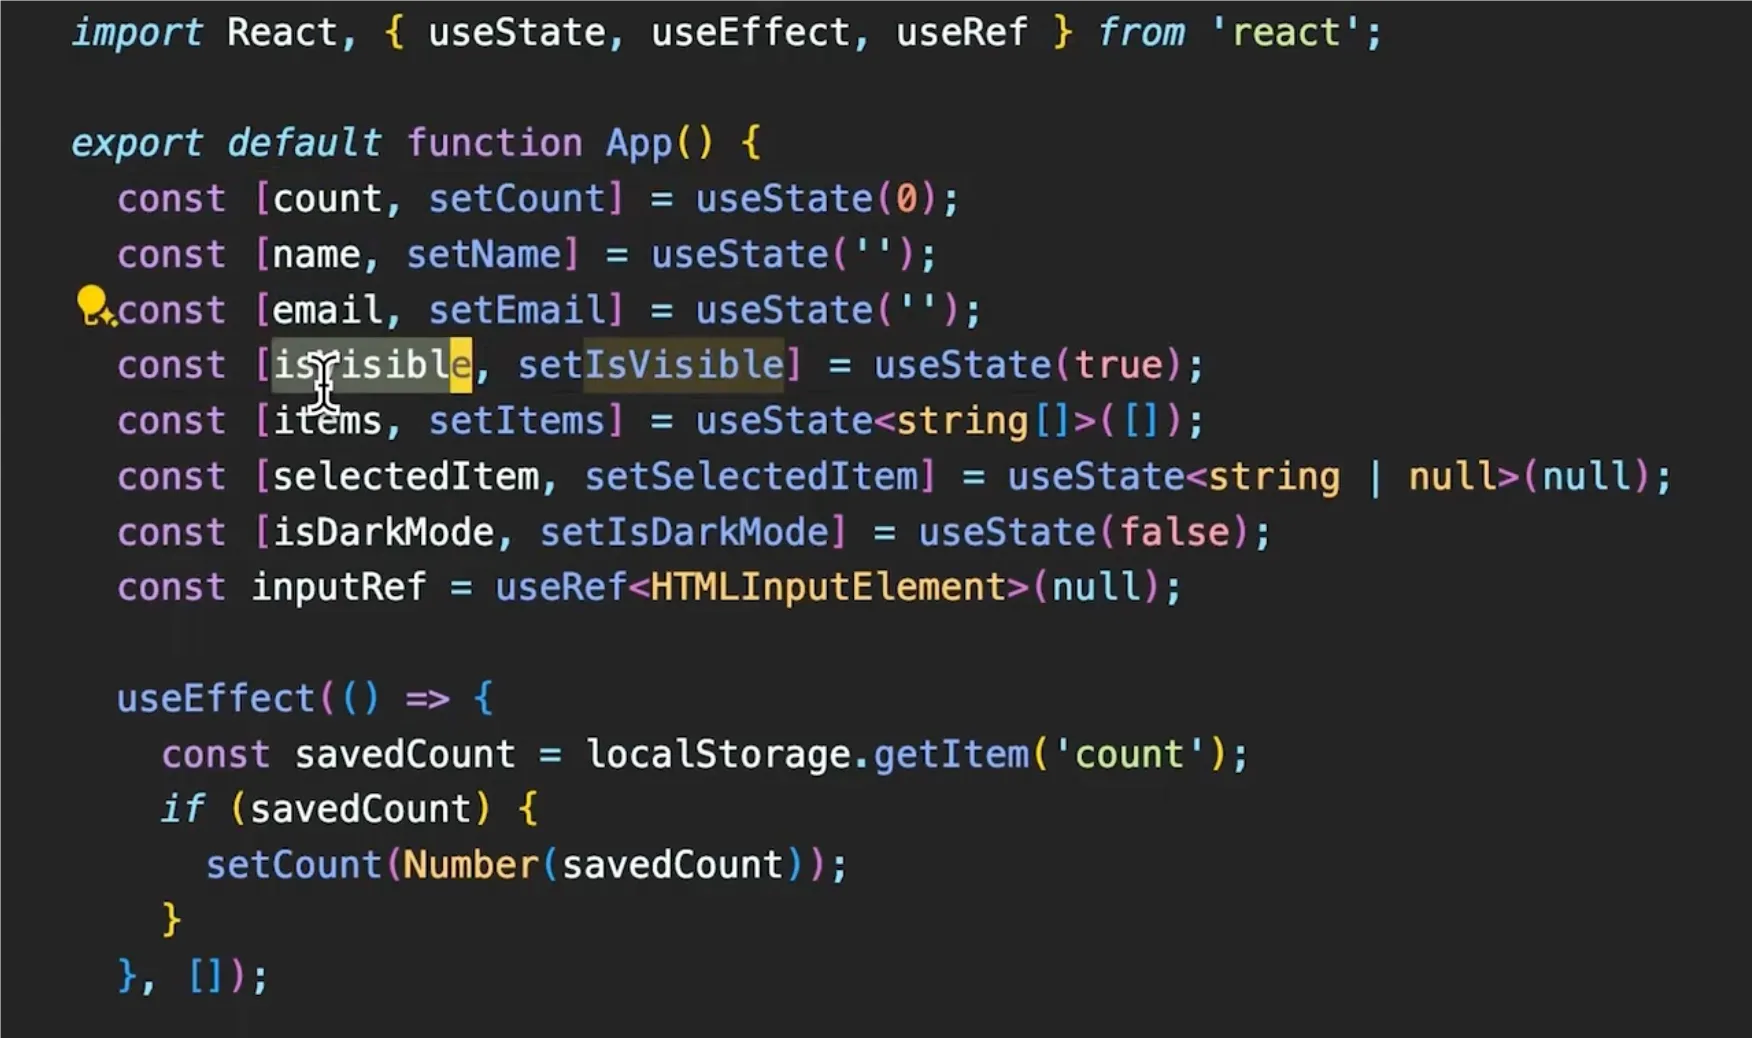
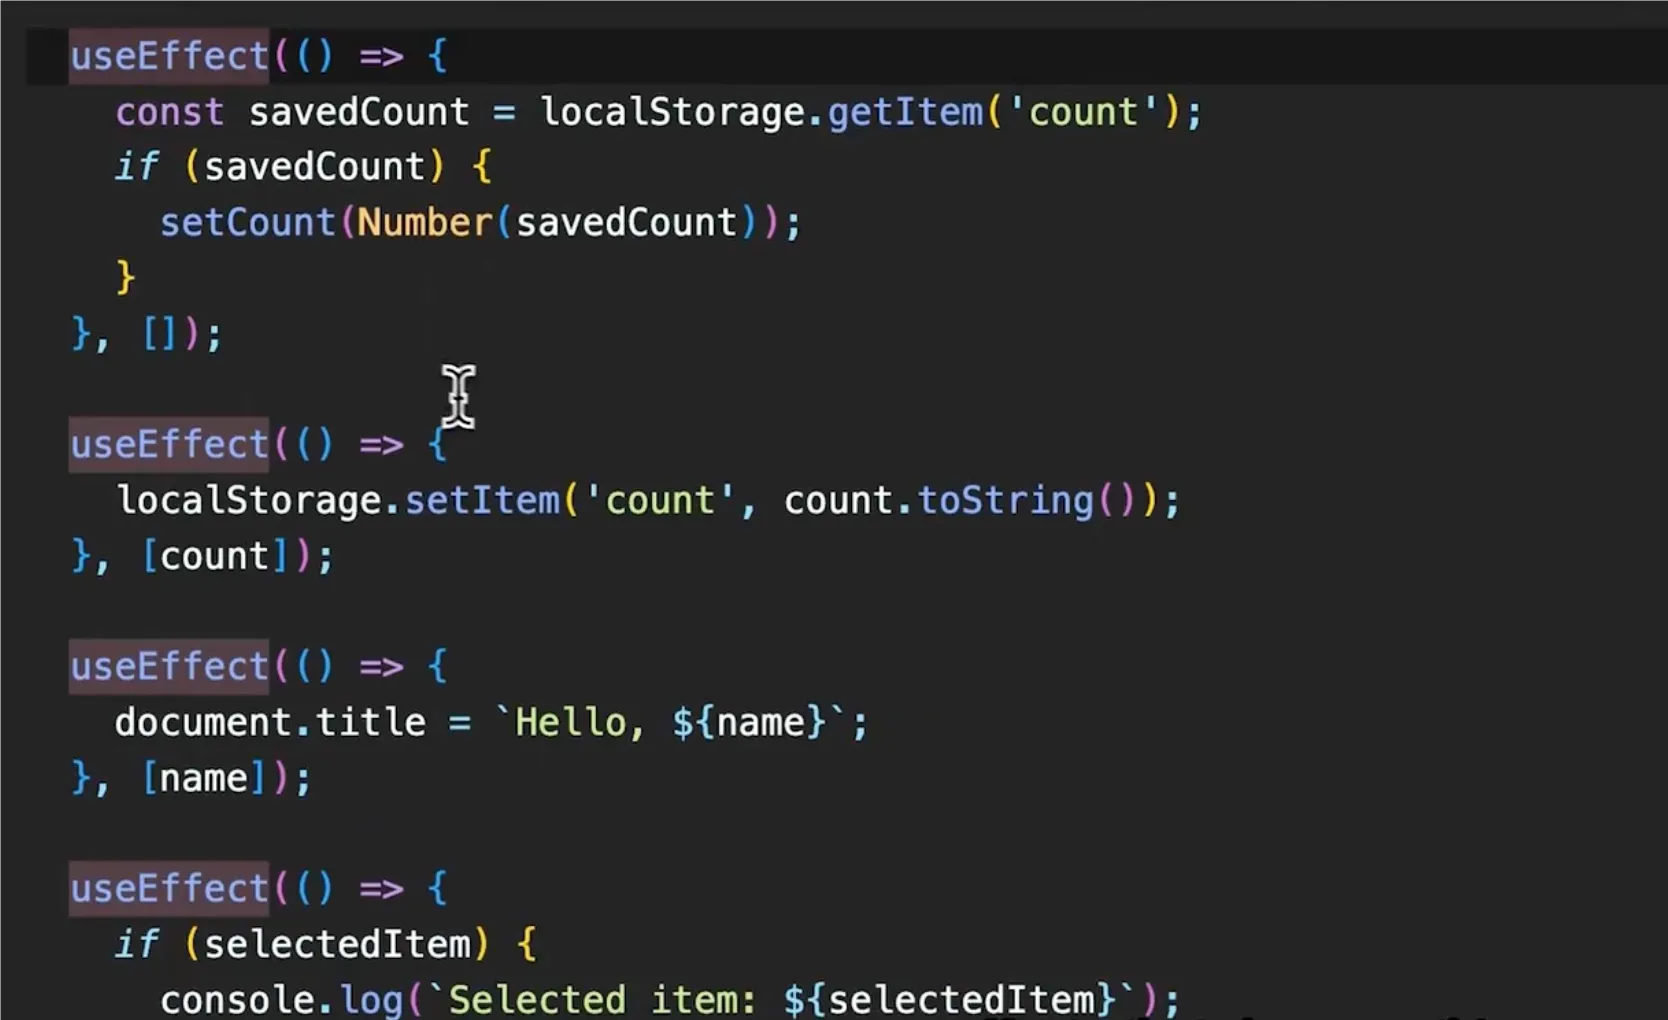
可以看到,在这个示例文件中,将很多不同作用的状态、钩子以及函数都放在了一个 TSX 组件中,如果是一个初级开发人员,看到这个文件是会感到无从下手的,因为这并没有遵循单个组件只负责一个功能的设计模式。
我们应该遵循:一个组件只做一件事情,如果需要做其他事情,则会使用其他的组件或函数。
现在让我们来重构它:
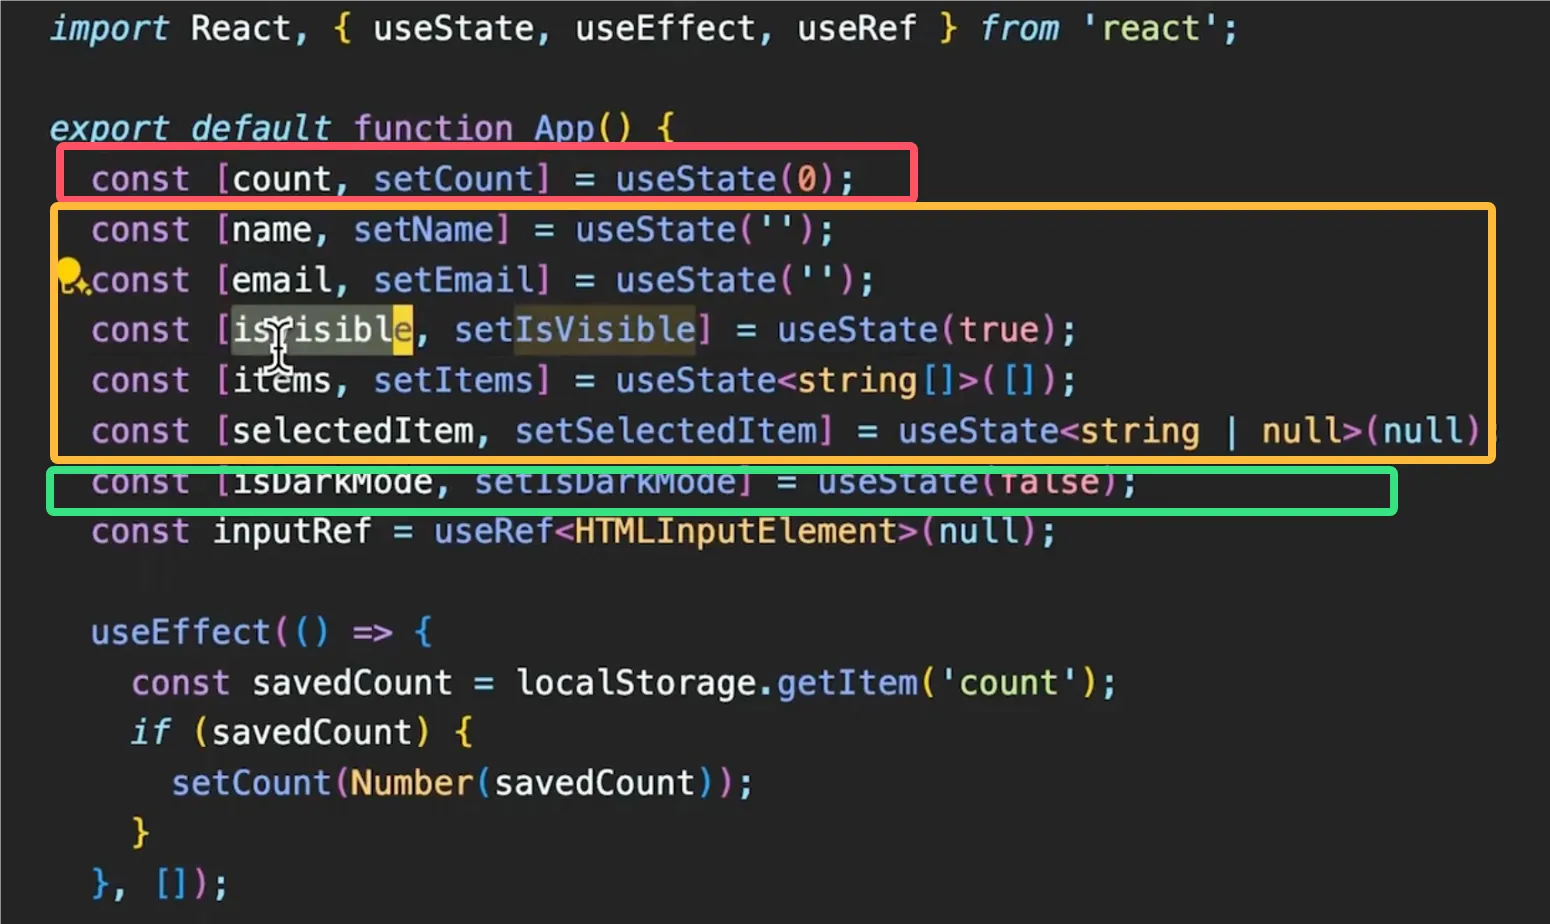
我们可以看到,在状态中,分为了**计数(红色)、用户的信息(黄色)、暗夜模式(绿色)**三个部分。暗夜模式、计数 和 用户信息无关,所以我们要将它拿出去。
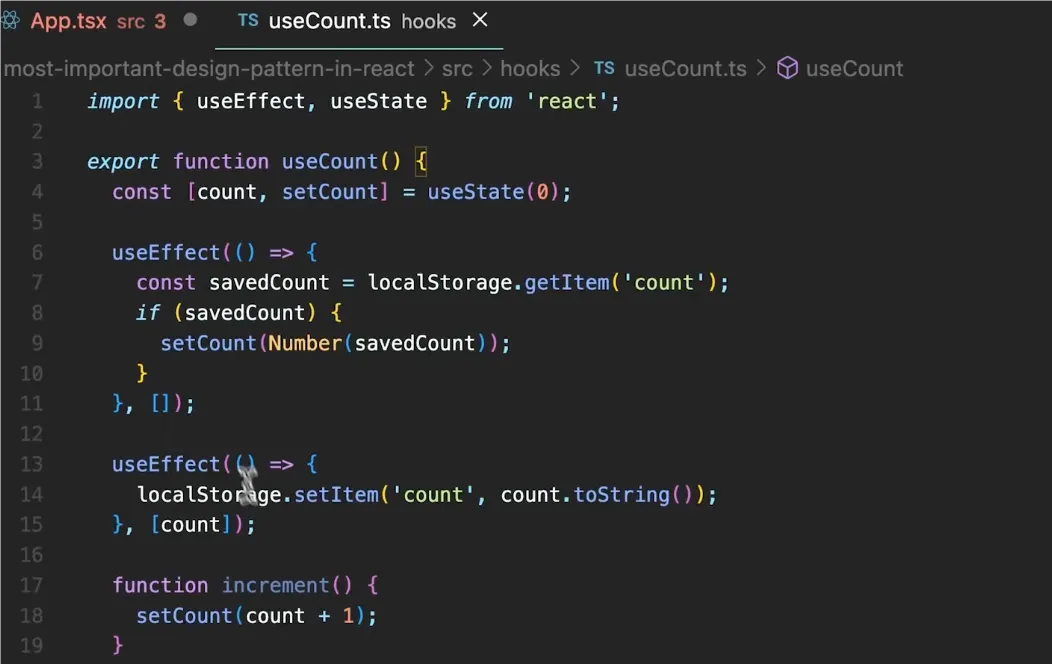
像这样,我们把所有计数部分的逻辑都放在了一个单独的 hooks文件 中
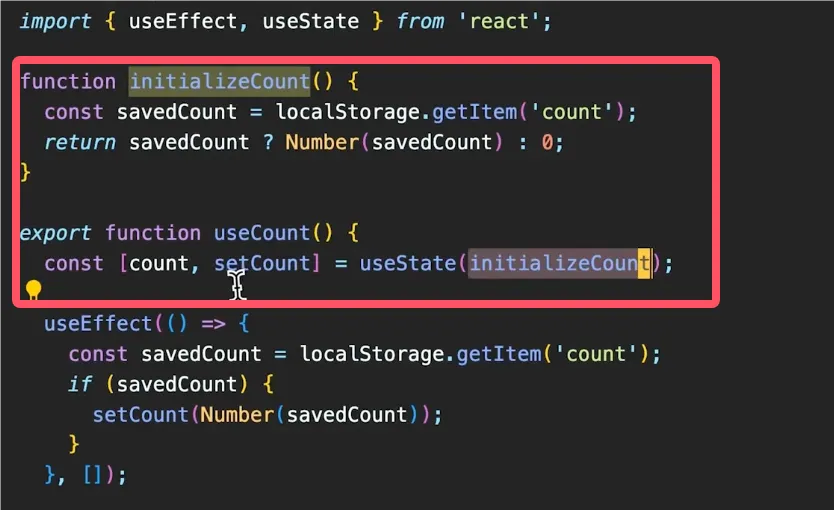
同时,我们将会使用一个函数来获取初始值
当然,这样的写法会导致只有第一次渲染这个组件会执行函数
如果你需要每次渲染都执行的话,请使用函数名( )
2. 自定义 Hook 提取逻辑 🧩
自定义 Hook 能让我们轻松复用逻辑,并保持代码简洁。
带参数的自定义 Hook 🎯
你可以通过为 Hook 提供参数来增强其通用性。比如我们可以为计数器增加初始值、步长等参数。
function useCounter(initialValue = 0, step = 1) {
  const [count, setCount] = useState(initialValue);

  const increment = () => setCount(c => c + step);
  const decrement = () => setCount(c => c - step);

  return { count, increment, decrement };
}
3. 使用 Context 和 Reducer 管理复杂状态 🌍
对于大型项目,跨组件共享状态时,Context 和 useReducer 是非常有力的工具。
使用 useReducer 管理复杂状态 🔄
对于复杂的状态管理,可以使用 useReducer 来替代多次调用 useState。它的逻辑更加集中,适合处理复杂的状态变化。
// 定义初始状态
const initialState = { count: 0 };

// reducer 函数,用于处理状态更新
function reducer(state, action) {
  switch (action.type) {
    case "increment":
      // 当 action.type 为 'increment' 时,返回新的状态,count 增加 1
      return { count: state.count + 1 };
    case "decrement":
      // 当 action.type 为 'decrement' 时,返回新的状态,count 减少 1
      return { count: state.count - 1 };
    default:
      // 如果 action.type 不匹配,抛出错误
      throw new Error();
  }
}

// Counter 组件
function Counter() {
  // 使用 useReducer Hook 来管理状态
  const [state, dispatch] = useReducer(reducer, initialState);

  return (
    <div>
      {/* 显示当前计数 */}
      <p>Count: {state.count}</p>
      {/* 点击按钮时,派发 increment action */}
      <button onClick={() => dispatch({ type: "increment" })}>+</button>
      {/* 点击按钮时,派发 decrement action */}
      <button onClick={() => dispatch({ type: "decrement" })}>-</button>
    </div>
  );
}
使用 Context API 管理全局状态 🌍
Context API 是解决 Prop Drilling 的有效工具。你可以将全局状态放入 Context,并通过 useContext 获取它。
// 创建一个用户上下文,初始值为 null
const UserContext = createContext(null);

// 用户提供者组件
function UserProvider({ children }) {
  // 使用 useState Hook 来管理用户状态
  const [user, setUser] = useState(null);

  return (
    // 使用 UserContext.Provider 来提供用户状态和更新函数
    <UserContext.Provider value={{ user, setUser }}>
      {children} {/* 渲染子组件 */}
    </UserContext.Provider>
  );
}

// 用户个人资料组件
function UserProfile() {
  // 使用 useContext Hook 来获取 UserContext 中的用户信息
  const { user } = useContext(UserContext);

  // 根据用户状态渲染不同的内容
  return <div>{user ? `Hello, ${user.name}` : "No user logged in"}</div>;
}
优化 Context:useContext 和 useReducer 结合 💡
对于复杂状态,使用 Context 结合 useReducer 可以有效管理全局状态。
// 定义初始状态,用户初始为 null
const initialState = { user: null };

// reducer 函数用于处理状态更新
function reducer(state, action) {
  switch (action.type) {
    // 当 action.type 为 'login' 时,更新用户状态
    case "login":
      return { ...state, user: action.payload }; // 将用户信息更新为 action.payload
    // 当 action.type 为 'logout' 时,重置用户状态为 null
    case "logout":
      return { ...state, user: null }; // 用户登出,设置为 null
    // 如果 action.type 不匹配任何情况,抛出错误
    default:
      throw new Error();
  }
}

// 创建一个上下文,用于在组件树中共享用户状态
const UserContext = createContext(null);

// UserProvider 组件用于提供用户状态和 dispatch 函数
function UserProvider({ children }) {
  // 使用 useReducer 钩子来管理状态,返回当前状态和 dispatch 函数
  const [state, dispatch] = useReducer(reducer, initialState);

  // 使用 UserContext.Provider 组件将状态和 dispatch 函数传递给子组件
  return (
    <UserContext.Provider value={{ state, dispatch }}>
      {children} // 渲染子组件
    </UserContext.Provider>
  );
}

// LoginButton 组件用于处理用户登录
function LoginButton() {
  // 使用 useContext 钩子获取 UserContext 中的 dispatch 函数
  const { dispatch } = useContext(UserContext);

  // 定义登录函数,触发登录操作
  const login = () => {
    // 调用 dispatch 函数,发送登录 action
    dispatch({ type: "login", payload: { name: "John Doe" } }); // 登录时设置用户信息
  };

  // 渲染一个按钮,点击时调用登录函数
  return <button onClick={login}>Login</button>;
}
扩展:避免 Prop Drilling 🚪
Prop Drilling 是指当一个状态需要传递给多层嵌套的组件时,必须通过中间组件一层一层传递。使用 Context API 可以有效解决这个问题。
const UserContext = createContext(null);

function UserProvider({ children }) {
  const [user, setUser] = useState(null);

  return <UserContext.Provider value={{ user, setUser }}>{children}</UserContext.Provider>;
}

function UserProfile() {
  const { user } = useContext(UserContext);
  return <div>{user ? `Hello, ${user.name}` : "No user logged in"}</div>;
}
4. 错误边界与性能优化 🛠
错误边界 🔥
React 允许你通过 Error Boundaries 捕获组件树中的错误,防止整个应用崩溃。
// 定义一个错误边界组件
class ErrorBoundary extends React.Component {
  // 构造函数,初始化状态
  constructor(props) {
    super(props);
    // 定义一个状态 hasError,初始值为 false
    this.state = { hasError: false };
  }

  // 当子组件抛出错误时,更新状态
  static getDerivedStateFromError() {
    // 返回一个新的状态对象,设置 hasError 为 true
    return { hasError: true };
  }

  // 捕获错误并记录错误信息
  componentDidCatch(error, errorInfo) {
    // 在控制台输出错误和错误信息
    console.error("Error caught:", error, errorInfo);
  }

  // 渲染方法
  render() {
    // 如果 hasError 为 true,渲染错误提示信息
    if (this.state.hasError) {
      return <h1>Something went wrong.</h1>; // 显示错误信息
    }

    // 否则,渲染子组件
    return this.props.children; // 渲染正常的子组件
  }
}
性能优化 💨
通过 React.memo、useMemo 和 useCallback 可以优化组件渲染性能,避免不必要的重新渲染。
const ExpensiveComponent = React.memo(({ data }) => {
  // Only re-renders when 'data' changes
  return <div>{data}</div>;
});

function ParentComponent() {
  const data = useMemo(() => expensiveCalculation(), []);

  const handleClick = useCallback(() => {
    console.log("Button clicked");
  }, []);

  return <ExpensiveComponent data={data} onClick={handleClick} />;
}
5. 懒加载与代码分割 📦
React 提供了 React.lazy 和 Suspense 来实现组件的懒加载,从而提高应用性能。
const LazyComponent = React.lazy(() => import("./LazyComponent"));

function App() {
  return (
    <Suspense fallback={<div>Loading...</div>}>
      <LazyComponent />
    </Suspense>
  );
}
6. 类型安全:TypeScript 与 PropTypes 💻
在 React 开发中,类型安全是保证代码健壮性的关键。使用 TypeScript 或 PropTypes 可以确保组件的 props 类型正确。
// 导入 PropTypes 库,用于类型检查
import PropTypes from "prop-types";

// 定义一个函数组件 MyComponent,接收 props 参数
function MyComponent({ name, age }) {
  // 渲染组件内容,显示用户的名字和年龄
  return (
    <div>
      {name} is {age} years old. {/* 显示 name 和 age 的值 */}
    </div>
  );
}

// 定义 propTypes,进行类型检查
MyComponent.propTypes = {
  name: PropTypes.string.isRequired, // name 属性必须是字符串类型且是必需的
  age: PropTypes.number.isRequired, // age 属性必须是数字类型且是必需的
};
或者使用 TypeScript:
type MyComponentProps = {
  name: string;
  age: number;
};

function MyComponent({ name, age }: MyComponentProps) {
  return (
    <div>
      {name} is {age} years old.
    </div>
  );
}